This blog has ran on a dedicated WordPress installation hosted by domeneshop.no. A couple of weeks ago, I decided to move my blog to Azure Web Sites. There were many reasons for this, all of them evolving around me wanting to investigate the technology and the offerings in Microsoft Azure in general, and in Web Sites in particular. Here’s how it went.
Creating the new site
The first step was obviously to create the new Web site in Azure. This turned out being very simple. I used the first part of Dave Bost’s blog series on Moving a WordPress Blog to Windows Azure for guidance. It all went easy peasy.
Moving the content
When Wordpess had been installed, the next step was to move the content. This step was a bit troublesome, and I had to try this I few times before making it work. I tried Dave’s approach in Moving a WordPress Blog to Windows Azure – Part 2, but it did not work our quite well for me. First of all, the “Portable phpMyAdmin” admin had evolved into “Adminer”, and a few of the features seems to have been changed on the way.
I ended up with first copying the content of the wp-content/uploads directory using FTP. Using FileZilla as a client, all I needed to do, was to reset my deployment credentials for the web site in Azure. I was then able to log in using FTP. (I were not able to make SFTP work, though.)
I then reinstalled the themes and plugins on the new site manually. After all, this was a good opportunity to clean up anyways, leaving the dated, not used, plugins and themes behind.
Finally, I moved the blog posts using the build in export and import functionality in WordPress.
Changing URLs
My intention as to host the www.kongsli.net address using my newly installed site at http://musings.azurewebsites.net. One tiny detail regarding URLs was that on my old site, the WordPress installation was in the subdirectory /nblog. On my new site, the WordPress installation was in the root directory. So I needed to forward requests to /nblog/* to /*. My first idea was to use IIS Rewrites for this, but according to this Stackoverflow question this module is not installed in Azure web sites. Instead, I then went on to creating an extremely simple ASP.NET MVC app to do the redirection. (Yes, I could probably have pulled this off using Web API as well, but MVC is more familiar to me)
Here is the essential code:
public class HomeController : Controller
{
    public ActionResult Index(string id)
    {
        var queryString = Request.QueryString.ToString();
        var location = "/" + id + (string.IsNullOrEmpty(queryString) ? string.Empty : "?" + queryString);
        return new RedirectResult(location, true);
    }
}
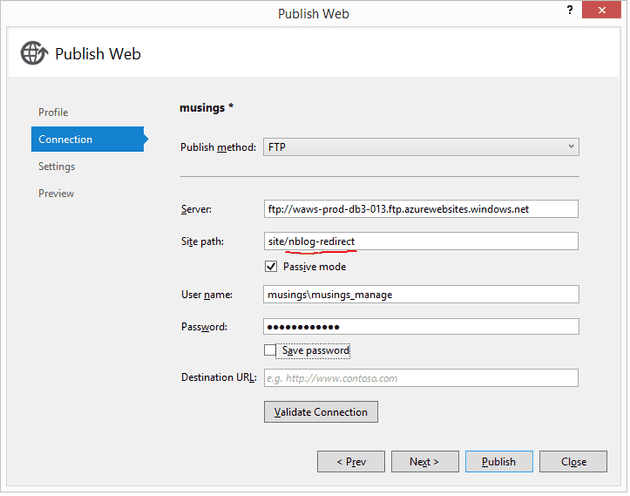
The trick I wanted to use, then, is to install this application in IIS under /nblog so that it will handle all requests to /nblog/*. To do this, I needed to use the FTP method for publishing the app to Azure:
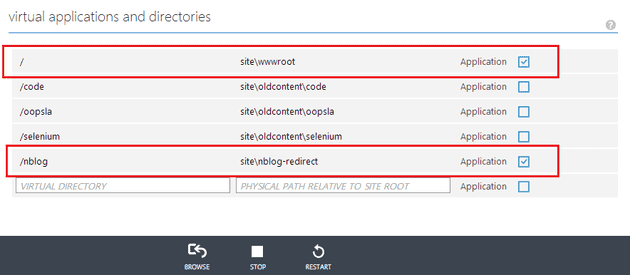
Notice that the site path is set to site/nblog-redirector, which will locate it “beside” the WordPress installation at site/wwwroot on the server. Then, the application can be set up in the Azure Management
portal:
As you can see from the picture above, I also had to take care of some other content besides my blog, that I could FTP to the new site and register as virtual directories in IIS. Pretty nifty.
Using a custom domain
I wanted to host www.kongsli.net using my new web site in Azure. There were essentially two steps needed for this, only one of which that was apparent to me at the time. The apparent one was that I needed a DNS record that pointed www.kongsli.net to the web site. The existing record was an A record that pointed www.kongsli.net to my current hosting provider’s infrastructure. Because of the scalable, high availability nature of Azure web sites, this needed to be replaced by a CNAME record pointing www.kongsli.net to musings.azurewebsites.net. This as easy to set up at my current DNS provider:
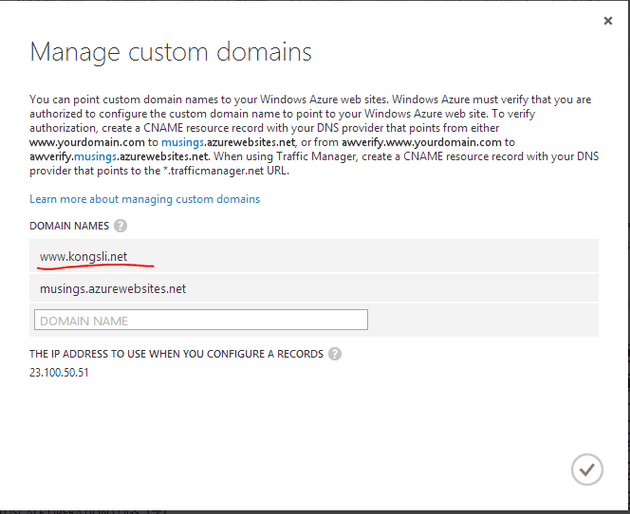
Once set up, all there was to do, was to wait for the DNS change to propagate. At least, so I thought. The final piece of the puzzle, was that the custom domain name to be hosted in the Azure web site needed to be registered. There might be more to it, but I guess that the web sites uses host headers to distinguish requests in shared hosting scenarios in Azure web sites. I also found that in order to add custom domain names, I needed to change my hosting plan from “Free” to at least “shared”. When I did, I could register my domain:
And voilá.


