The Azure compute and storage emulators enable testing and debugging of Azure cloud services on the developer’s local computer. On my current project, I ran into the need to install and run the emulator in the test environment. I will not go into exactly why this was needed, but it could be a possible interim solution to try out the technology before your customer make the decision to establish an environment in Azure. There were quite a few hurdles in the way to do this. I try to summarize them all in this post.
So the basic setup that I will explain in this blog post is to build a package for deployment in the compute emulator on the Team City build server. We will do the deployment using Octopus Deploy:
+-------------+   +--------------+   +---------------+   +---------+----------+
|             |   |              |   |               |   |  Test environment  |
| Dev machine +---> Build server +---> Deploy server +---> (Compute emulator) |
|             |   | (Team City)  |   | (Octopus)     |   | (Storage emulator) |
|             |   |              |   |               |   |                    |
+-------------+   +--------------+   +---------------+   +--------------------+
Preparing the test environment
This step consists of preparing the test environment for running the emulators.
Installing the SDK
First of all, let’s install the necessary software. I used the currently (September 2014) latest version of the Microsoft Azure SDK, version 2.4. This is available in the Microsoft web platform installer (http://www.microsoft.com/web/downloads/platform.aspx):

Take note of the installation paths for the emulators. You’ll need them later on:
Compute emulator: C:\Program Files\Microsoft SDKs\Azure\Emulator
Storage emulator: C:\Program Files (x86)\Microsoft SDKs\Azure\Storage Emulator
Create a user for the emulator
The first problem I ran into was concerning which user should run the deployment scripts. In a development setting, this is currently logged in user on the computer, but in a test environment case, this is not so.
I decided to create a domain managed service account named “octopussy” for this. (You know, that James Bond movie.) Then, I made sure that that user was a local admin on the test machine by running
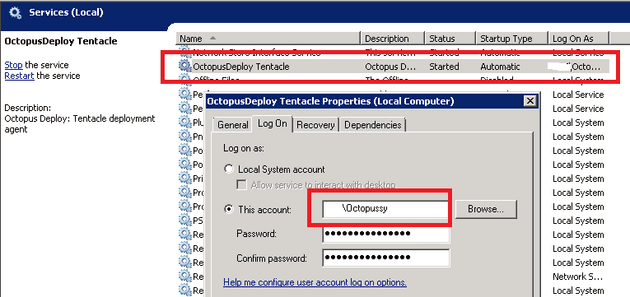
net localgroup administrators domain1\octopussy /addIn order for the Octopus Deploy tentacle to be able to run the deployment, the tentacle service must run as the aforementioned user account:

Creating windows services for storage and compute emulators
In a normal development situation, the emulator run as the logged in user. If you remotely log in to a computer and start the emulators, they will shut down when you log off. In a test environment, we need the emulators to keep running. Therefore, you should set them up to run as services. There are several ways to do this, and I choose to use the Non-sucking service manager.
First, create a command file that starts the emulator and never quits:
storage_service.cmd:
@echo off
"C:\Program Files (x86)\Microsoft SDKs\Azure\Storage Emulator\WAStorageEmulator.exe" start
pause
devfabric_service.cmd:
@echo off
"C:\Program Files\Microsoft SDKs\Azure\Emulator\csrun.exe" /devfabric
pause
Once the commands files are in place, define and start the services:
.\nssm.exe install az_storage C:\app\storage_service.cmd
.\nssm.exe set az_storage ObjectName 'domain1\octopussy' 'PWD'
.\nssm.exe set az_storage Start service_auto_start
start-service az_storage
.\nssm.exe install az_fabric C:\app\devfabric_service.cmd
.\nssm.exe set az_fabric ObjectName 'domain1\octopussy' 'PWD'
.\nssm.exe set az_fabric Start service_auto_start
start-service az_fabric
Change the storage endpoints
In a test environment, you would often like to access the storage emulator from remote machines, for instance for running integration tests. Again, being focused on local development, the storage emulator is only accessible on localhost. To fix this, you need to edit the file
C:\Program Files (x86)\Microsoft SDKs\Azure\Storage Emulator\WAStorageEmulator.exe.configPer default, the settings for the endpoints are like so:
<services>
    <service name="Blob"  url="http://127.0.0.1:10000/" />
    <service name="Queue" url="http://127.0.0.1:10001/" />
    <service name="Table" url="http://127.0.0.1:10002/" />
</services>
The 127.0.0.1 host references should be change to the host’s IP address or NetBIOS name. This can easily be found using ipconfig. For example:
<services>
    <service name="Blob"  url="http://192.168.0.2:10000/" />
    <service name="Queue" url="http://192.168.0.2:10001/" />
    <service name="Table" url="http://192.168.0.2:10002/" />
</services>
I found this trick here.
What we can do now, is to reach the storage emulator endpoints from a remote client. To do this, we need to set the DevelopmentStorageProxyUri parameter in the connection string, like so:
UseDevelopmentStorage=true;DevelopmentStorageProxyUri=http://192.168.0.2In some circumstances, for instance if accessing the storage services using Visual Studio server explorer, you cannot use the UseDevelopmentStorage parameter in the connection string. Then you need to format the connection string like this:
BlobEndpoint=http://192.168.0.2:10000/;QueueEndpoint=http://192.168.0.2:10002/;TableEndpoint=http://192.168.0.2:10001/;AccountName=devstoreaccount1;AccountKey=Eby8vdM02xNOcqFlqUwJPLlmEtlCDXJ1OUzFT50uSRZ6IFsuFq2UVErCz4I6tq/K1SZFPTOtr/KBHBeksoGMGw==Open endpoints in firewall
If you run your test environment on a server flavor of Windows, you might have to open up the storage emulator TCP ports in the firewall:
netsh advfirewall firewall add rule name=storage_blob  dir=in action=allow protocol=tcp localport=10000
netsh advfirewall firewall add rule name=storage_queue dir=in action=allow protocol=tcp localport=10001
netsh advfirewall firewall add rule name=storage_table dir=in action=allow protocol=tcp localport=10002
Create a package for emulator deployment
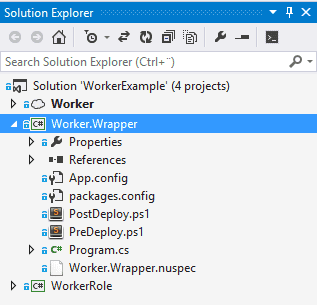
So, now that we have the test environment set with the Azure emulators, let’s prepare our application for build and deployment. My example application consists of one Worker role:
One challenge here is that if you build the cloud project for the emulator, no real “package” is created. The files are laid out as a directory structure to be picked up locally by the emulator. The package built for the real McCoy is not compatible with the emulator. Also, in order to deploy the code using Octopus Deploy, we need to wrap it as a Nuget package. The OctoPack tool is the natural choice for such a task, but it does not support the cloud project type.
Console project as ‘wrapper’
To fix the problem with creating a Nuget package for deployment to the emulator, we create a console project to act as a “wrapper.” We have no interest in a console application per se, but only in the project as a vehicle to create a Nuget package. So, we add a console project to our solution:
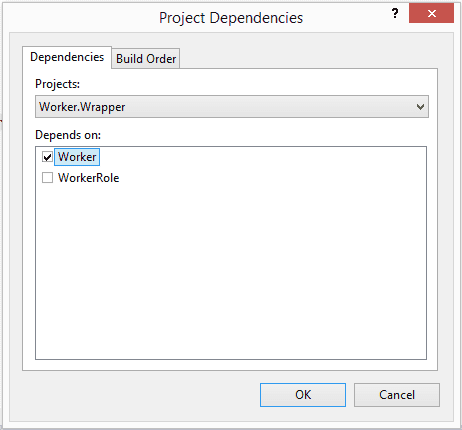
We have to make sure that the WorkerRole project is built before our wrapper project, so we make sure the build order in the solution is correct:
Customizing the build
What we want, is the build to perform the following steps:
- Build WorkerRole dll
- Build Worker (cloud project) – prepare files for the compute emulator
- Build Worker.Wrapper – package compute emulator files and deployment script into a Nuget package
We have the two steps already covered with the existing setup. So what we need to do in the third step is to copy the prepared files to the build output directory of the Wrapper project, and then have OctoPack pick them up from there.
To copy the files, we set up a custom build step in the Wrapper project:
<PropertyGroup>
    <BuildDependsOn>
    CopyCsxFiles;
    $(BuildDependsOn);
  </BuildDependsOn>
  </PropertyGroup>
  <PropertyGroup>
    <CsxDirectory>$(MSBuildProjectDirectory)\..\Worker\csx\$(Configuration)</CsxDirectory>
  </PropertyGroup>
  <Target Name="CopyCsxFiles">
    <CreateItem Include="$(CsxDirectory)\**\*.*">
      <Output TaskParameter="Include" ItemName="CsxFilesToCopy" />
    </CreateItem>
    <ItemGroup>
      <CsConfigFile Include="$(MSBuildProjectDirectory)\..\Worker\ServiceConfiguration.Cloud.cscfg" />
    </ItemGroup>
    <Copy SourceFiles="@(CsxFilesToCopy)" DestinationFiles="@(CsxFilesToCopy->'$(OutDir)\%(RecursiveDir)%(Filename)%(Extension)')" />
    <Copy SourceFiles="@(CsConfigFile)" DestinationFolder="$(OutDir)" />
  </Target>
We copy all the files in the csx directory in addition to the cloud project configuration file.
The next step is then to install OctoPack in the Wrapper project. This is done using the package manager console:
Install-Package OctoPack -ProjectName Worker.WrapperWe’re almost set. Like I said earlier, the Wrapper project is a console project, but we are not really interested in a console application. So in order to remove all unnecessary gunk from our deployment package, we specify a .nuspec file where we explicitly list the files we need in the package. The .nuspec file name is prefixed with the project name. In this case, Worker.Wrapper.nuspec, and it contains:
<package xmlns="http://schemas.microsoft.com/packaging/2010/07/nuspec.xsd">
  <files>
    <file src="bin\release\roles\**\*.*" target="roles" />
    <file src="bin\release\Service*" target="." />
    <file src="PostDeploy.ps1" target="." />
    <file src="PreDeploy.ps1" target="." />
  </files>
</package>
We can now create a deployment package from msbuild, and set for build this artifact on Team City:
msbuild WorkerExample.sln /p:RunOctoPack=true /p:Configuration=Release /p:PackageForComputeEmulator=true
dir Worker.Wrapper\bin\release\*.nupkg
Notice that we set the property PackageForComputeEmulator to true. If not, Msbuild will package for the real Azure compute service in release configuration.
Deployment scripts
The final step is to deploy the application. Using Octopus Deploy, this is quite simple. Octopus has a convention where you can add PowerShell scripts to be executed before and after the deployment. The deployment of a console app using Octopus Deploy consists of unpacking the package on the target server. In our situation we need to tell the emulator to pick up and deploy the application files afterwards.
In order to finish up the deployment step, we create one file PreDeploy.ps1 that is executed before the package is unzipped, and one file PostDeploy.ps1 to be run afterwards.
PreDeploy.ps1
In this step, we make sure that the emulators are running, and remove any existing deployment in the emulator:
$computeEmulator = "${env:ProgramFiles}\Microsoft SDKs\Azure\Emulator\csrun.exe"
$storageEmulator = "${env:ProgramFiles(x86)}\Microsoft SDKs\Azure\Storage Emulator\WAStorageEmulator.exe"

$ErrorActionPreference = 'continue'
Write-host "Starting the storage emulator, $storageEmulator start"
& $storageEmulator start 2>&1 | out-null

$ErrorActionPreference = 'stop'
Write-host "Checking if compute emulator is running"
& $computeEmulator /status 2>&1 | out-null
if (!$?) {
    Write-host "Compute emulator is not running. Starting..."
    & $computeEmulator /devfabric:start
}

Write-host "Removing existing deployments, running $computeEmulator /removeall"
& $computeEmulator /removeall
PostDeploy.ps1
In this step, we do the deployment of the new application files to the emulator:
$here = split-path $script:MyInvocation.MyCommand.Path
$computeEmulator = "${env:ProgramFiles}\Microsoft SDKs\Azure\Emulator\csrun.exe"

$ErrorActionPreference = 'stop'
$configFile = join-path $here 'ServiceConfiguration.Cloud.cscfg'

Write-host "Deploying to the compute emulator $computeEmulator $here $configFile"
& $computeEmulator $here $configFile
And with that, we are done.


